mirror of
https://github.com/denizsafak/abogen.git
synced 2026-07-18 13:40:27 +02:00

832 lines
36 KiB
Markdown
832 lines
36 KiB
Markdown
# abogen <img width="40px" title="abogen icon" src="https://raw.githubusercontent.com/denizsafak/abogen/refs/heads/main/abogen/assets/icon.ico" align="right" style="padding-left: 10px; padding-top:5px;">
|
||
|
||
[](https://github.com/denizsafak/abogen/actions)
|
||
[](https://github.com/denizsafak/abogen/releases/latest)
|
||
[](https://pypi.org/project/abogen/)
|
||
[](https://github.com/denizsafak/abogen/releases/latest)
|
||
[&color=blue)](https://pypi.org/project/abogen/)
|
||
[](https://github.com/psf/black)
|
||
[](https://opensource.org/licenses/MIT)
|
||
|
||
<a href="https://trendshift.io/repositories/14433" target="_blank"><img src="https://trendshift.io/api/badge/repositories/14433" alt="denizsafak%2Fabogen | Trendshift" style="width: 250px; height: 55px;" width="250" height="55"/></a>
|
||
|
||
Abogen is a powerful text-to-speech conversion tool that makes it easy to turn ePub, PDF, text, markdown, or subtitle files into high-quality audio with matching subtitles in seconds. Use it for audiobooks, voiceovers for Instagram, YouTube, TikTok, or any project that needs natural-sounding text-to-speech, using [Kokoro-82M](https://huggingface.co/hexgrad/Kokoro-82M).
|
||
|
||
<img title="Abogen Main" src='https://raw.githubusercontent.com/denizsafak/abogen/refs/heads/main/demo/abogen.png' width="380"> <img title="Abogen Processing" src='https://raw.githubusercontent.com/denizsafak/abogen/refs/heads/main/demo/abogen2.png' width="380">
|
||
|
||
## Demo
|
||
|
||
https://github.com/user-attachments/assets/094ba3df-7d66-494a-bc31-0e4b41d0b865
|
||
|
||
> This demo was generated in just 5 seconds, producing ~1 minute of audio with perfectly synced subtitles. To create a similar video, see [the demo guide](https://github.com/denizsafak/abogen/tree/main/demo).
|
||
|
||
---
|
||
|
||
## Table of Contents
|
||
|
||
- [Installation](#installation)
|
||
- [Windows](#windows)
|
||
- [macOS](#macos)
|
||
- [Linux](#linux)
|
||
- [Interfaces](#interfaces)
|
||
- [Desktop Application (PyQt)](#️-desktop-application-pyqt)
|
||
- [How to Run](#how-to-run)
|
||
- [How to Use](#how-to-use)
|
||
- [Configuration Options](#configuration-options)
|
||
- [Voice Mixer](#voice-mixer)
|
||
- [Queue Mode](#queue-mode)
|
||
- [Web Application (WebUI)](#-web-application-webui)
|
||
- [How to Run](#how-to-run-1)
|
||
- [How to Use](#how-to-use-1)
|
||
- [Docker / Container](#container-image)
|
||
- [LLM Text Normalization](#llm-assisted-text-normalization)
|
||
- [Audiobookshelf Integration](#audiobookshelf-integration)
|
||
- [JSON API Endpoints](#json-endpoints)
|
||
- [Core Features](#core-features)
|
||
- [Chapter Markers](#chapter-markers)
|
||
- [Metadata Tags](#metadata-tags)
|
||
- [Timestamp-based Text Files](#timestamp-based-text-files)
|
||
- [Supported Languages](#supported-languages)
|
||
- [Troubleshooting](#troubleshooting)
|
||
- [Contributing](#contributing)
|
||
- [Credits](#credits)
|
||
- [License](#license)
|
||
|
||
---
|
||
|
||
## Installation
|
||
|
||
> **Requirements:** Python 3.10-3.12 is required. [uv](https://docs.astral.sh/uv/getting-started/installation/) is the recommended package manager as it handles Python versions and dependencies automatically.
|
||
|
||
### Windows
|
||
|
||
#### Step 1: Install espeak-ng
|
||
|
||
espeak-ng is a required speech synthesis engine. Download the latest `.msi` installer from the [espeak-ng releases page](https://github.com/espeak-ng/espeak-ng/releases/latest) and run it.
|
||
|
||
#### Step 2: Install Abogen
|
||
|
||
Choose the method that works best for you:
|
||
|
||
<details>
|
||
<summary><b>Option A: Automatic installer (easiest, no setup required)</b></summary>
|
||
|
||
This is the simplest option. It sets up everything automatically, including Python and CUDA support, without touching your system Python installation.
|
||
|
||
1. [Download the repository as a ZIP](https://github.com/denizsafak/abogen/archive/refs/heads/main.zip) and extract it anywhere you like.
|
||
2. Open the extracted folder and double-click `WINDOWS_INSTALL.bat`.
|
||
3. Wait for the installation to finish. A shortcut to launch Abogen will be created in the folder.
|
||
|
||
> You do not need to install Python separately. The script handles it for you.
|
||
|
||
</details>
|
||
|
||
<details>
|
||
<summary><b>Option B: Install with uv (recommended for developers)</b></summary>
|
||
|
||
First, [install uv](https://docs.astral.sh/uv/getting-started/installation/) if you have not already. Then run the command that matches your GPU:
|
||
|
||
```bash
|
||
# NVIDIA GPU - CUDA 12.8 (most common, recommended)
|
||
uv tool install --python 3.12 abogen[cuda] --extra-index-url https://download.pytorch.org/whl/cu128 --index-strategy unsafe-best-match
|
||
|
||
# NVIDIA GPU - CUDA 12.6 (if the above does not work with your older drivers)
|
||
uv tool install --python 3.12 abogen[cuda126] --extra-index-url https://download.pytorch.org/whl/cu126 --index-strategy unsafe-best-match
|
||
|
||
# NVIDIA GPU - CUDA 13.0 (for the newest drivers)
|
||
uv tool install --python 3.12 abogen[cuda130] --extra-index-url https://download.pytorch.org/whl/cu130 --index-strategy unsafe-best-match
|
||
|
||
# No GPU / CPU only
|
||
uv tool install --python 3.12 abogen
|
||
```
|
||
|
||
> AMD GPUs are not supported on Windows. If you have an AMD GPU, you can use Linux with ROCm instead.
|
||
|
||
</details>
|
||
|
||
<details>
|
||
<summary><b>Option C: Install with pip</b></summary>
|
||
|
||
It is recommended to use a virtual environment to avoid conflicts with other Python packages.
|
||
|
||
```bash
|
||
# Create and activate a virtual environment
|
||
mkdir abogen && cd abogen
|
||
python -m venv venv
|
||
venv\Scripts\activate
|
||
|
||
# For NVIDIA GPUs:
|
||
# Install PyTorch with CUDA support
|
||
pip install torch==2.8.0+cu128 torchvision==0.23.0+cu128 torchaudio==2.8.0 --index-url https://download.pytorch.org/whl/cu128
|
||
|
||
# Install Abogen
|
||
pip install abogen
|
||
```
|
||
|
||
> If you do not have an NVIDIA GPU, skip the PyTorch step and go straight to `pip install abogen`.
|
||
|
||
</details>
|
||
|
||
**Common issues on Windows:**
|
||
- [How to fix "[WinError 1114] A dynamic link library (DLL) initialization routine failed" error?](#winError-1114-a-dynamic-link-library-dll-initialization-routine-failed)
|
||
- [How to fix "CUDA GPU is not available. Using CPU" warning?](#cuda-gpu-is-not-available-using-cpu)
|
||
|
||
---
|
||
|
||
### macOS
|
||
|
||
#### Step 1: Install espeak-ng
|
||
|
||
Open a terminal and run:
|
||
|
||
```bash
|
||
brew install espeak-ng
|
||
```
|
||
|
||
> If you do not have Homebrew installed, follow the instructions at [brew.sh](https://brew.sh) first.
|
||
|
||
#### Step 2: Install Abogen
|
||
|
||
<details>
|
||
<summary><b>Install with uv (recommended)</b></summary>
|
||
|
||
First, [install uv](https://docs.astral.sh/uv/getting-started/installation/) if you have not already. Then run the command that matches your Mac:
|
||
|
||
```bash
|
||
# Apple Silicon (M1, M2, M3, M4, etc.)
|
||
uv tool install --python 3.13 abogen --with "kokoro @ git+https://github.com/hexgrad/kokoro.git,numpy<2"
|
||
|
||
# Intel Mac
|
||
uv tool install --python 3.12 abogen --with "kokoro @ git+https://github.com/hexgrad/kokoro.git,numpy<2"
|
||
```
|
||
|
||
</details>
|
||
|
||
<details>
|
||
<summary><b>Install with pip</b></summary>
|
||
|
||
```bash
|
||
# Create and activate a virtual environment
|
||
mkdir abogen && cd abogen
|
||
python3 -m venv venv
|
||
source venv/bin/activate
|
||
|
||
# Install Abogen
|
||
pip3 install abogen
|
||
|
||
# Apple Silicon only: install the development version of Kokoro for MPS (GPU) support
|
||
pip3 install git+https://github.com/hexgrad/kokoro.git
|
||
```
|
||
|
||
</details>
|
||
|
||
---
|
||
|
||
### Linux
|
||
|
||
#### Step 1: Install espeak-ng
|
||
|
||
Open a terminal and run the command for your distro:
|
||
|
||
```bash
|
||
sudo apt install espeak-ng # Ubuntu / Debian
|
||
sudo pacman -S espeak-ng # Arch Linux
|
||
sudo dnf install espeak-ng # Fedora
|
||
```
|
||
|
||
#### Step 2: Install Abogen
|
||
|
||
<details>
|
||
<summary><b>Install with uv (recommended)</b></summary>
|
||
|
||
First, [install uv](https://docs.astral.sh/uv/getting-started/installation/) if you have not already. Then run the command that matches your GPU:
|
||
|
||
```bash
|
||
# For NVIDIA GPUs or without GPU - No need to include [cuda] in here.
|
||
uv tool install --python 3.12 abogen
|
||
|
||
# For AMD GPUs (ROCm 6.4)
|
||
uv tool install --python 3.12 abogen[rocm] --extra-index-url https://download.pytorch.org/whl/nightly/rocm6.4 --index-strategy unsafe-best-match
|
||
```
|
||
|
||
> Unlike Windows, CUDA support is included automatically on Linux with the standard install. No extra flags are needed for NVIDIA GPUs.
|
||
|
||
</details>
|
||
|
||
<details>
|
||
<summary><b>Install with pip</b></summary>
|
||
|
||
```bash
|
||
# Create and activate a virtual environment
|
||
mkdir abogen && cd abogen
|
||
python3 -m venv venv
|
||
source venv/bin/activate
|
||
|
||
# Install Abogen (NVIDIA GPU support is included automatically)
|
||
pip3 install abogen
|
||
|
||
# AMD GPU only: replace the default PyTorch with the ROCm build
|
||
pip3 uninstall torch
|
||
pip3 install --pre torch torchvision torchaudio --index-url https://download.pytorch.org/whl/nightly/rocm6.4
|
||
```
|
||
|
||
</details>
|
||
|
||
#### Step 3: Add Abogen to your PATH (if needed)
|
||
|
||
If you installed with uv or pip and the `abogen` command is not found after installation, run:
|
||
|
||
```bash
|
||
echo 'export PATH="$HOME/.local/bin:$PATH"' >> ~/.bashrc && source ~/.bashrc
|
||
```
|
||
|
||
**Common issues on Linux:**
|
||
- [How to fix "CUDA GPU is not available. Using CPU" warning?](#cuda-gpu-is-not-available-using-cpu)
|
||
- [How to fix "WARNING: The script abogen-cli is installed in '/home/username/.local/bin' which is not on PATH" error?](#warning-the-script-abogen-cli-is-installed-in-homeusernamelocalbinwhich-is-not-on-path)
|
||
- [How to fix "No matching distribution found" error?](#no-matching-distribution-found)
|
||
|
||
---
|
||
|
||
## Interfaces
|
||
|
||
Abogen offers **two interfaces** with different feature sets. The Web UI includes newer features that are still being integrated into the desktop app.
|
||
|
||
| Command | Interface | Description |
|
||
|---------|-----------|-------------|
|
||
| `abogen` | PyQt6 Desktop GUI | Stable core features |
|
||
| `abogen-web` | Flask Web UI | Core features + **Supertonic TTS**, **LLM Normalization**, **Audiobookshelf Integration**, and more |
|
||
|
||
> **Note:** The Web UI is under active development. Until the new features are merged into the desktop app, the Web UI provides the most complete experience. Special thanks to [@jeremiahsb](https://github.com/jeremiahsb) for his [massive contribution](https://github.com/denizsafak/abogen/pull/120) (>55,000 lines!) that brought the entire Web UI to life.
|
||
|
||
---
|
||
|
||
## 🖥️ `Desktop Application (PyQt)`
|
||
|
||
### How to Run
|
||
|
||
```bash
|
||
abogen
|
||
```
|
||
|
||
> If you used the Windows installer, a shortcut was created in the install folder or on your desktop. You can also run `python_embedded/Scripts/abogen.exe` directly.
|
||
|
||
### How to Use
|
||
|
||
1. **Drop a file:** drag and drop an ePub, PDF, `.txt`, `.md`, or subtitle file into the window, or type directly into the built-in text editor.
|
||
2. **Configure:** set the speech speed, voice, subtitle style, output format, and save location.
|
||
3. **Hit Start.**
|
||
|
||
<img title="Abogen in action" src='https://raw.githubusercontent.com/denizsafak/abogen/refs/heads/main/demo/abogen.gif'>
|
||
|
||
Here’s Abogen in action: in this demo, it processes ∼3,000 characters of text in just 11 seconds and turns it into 3 minutes and 28 seconds of audio, and I have a low-end **RTX 2060 Mobile laptop GPU**. Your results may vary depending on your hardware.
|
||
|
||
---
|
||
|
||
### Configuration Options
|
||
|
||
#### Input and Output
|
||
|
||
| Option | Description |
|
||
|--------|-------------|
|
||
| **Input Box** | Drag and drop `ePub`, `PDF`, `.TXT`, `.MD`, `.SRT`, `.ASS`, or `.VTT` files, or use the built-in text editor |
|
||
| **Queue** | Add multiple files and process them in batch with individual settings per file. See [Queue Mode](#queue-mode) |
|
||
| **Speed** | Adjust speech rate from `0.1x` to `2.0x` |
|
||
| **Output voice format** | `.WAV`, `.FLAC`, `.MP3`, `.OPUS` (best compression), or `M4B` (with chapters) |
|
||
| **Output subtitle format** | `SRT (standard)`, `ASS (wide)`, `ASS (narrow)`, `ASS (centered wide)`, `ASS (centered narrow)` |
|
||
| **Save location** | Save next to the input file, to the desktop, or pick a custom folder |
|
||
|
||
#### Voice
|
||
|
||
| Option | Description |
|
||
|--------|-------------|
|
||
| **Select Voice** | First letter sets the language (`a` = American English, `b` = British English, etc.), second letter sets the gender (`m` = male, `f` = female) |
|
||
| **Voice Mixer** | Blend multiple voice models together and save the result as a reusable profile. See [Voice Mixer](#voice-mixer) |
|
||
| **Voice Preview** | Listen to the selected voice before starting a full conversion |
|
||
|
||
#### Subtitles
|
||
|
||
| Option | Description |
|
||
|--------|-------------|
|
||
| **Generate Subtitles** | `Disabled`, `Line`, `Sentence`, `Sentence + Comma`, `Sentence + Highlighting`, or word-count modes like `1 word`, `2 words`, `3 words`, etc. |
|
||
| **Replace single newlines** | Replaces single newlines with spaces, which is useful for texts that have artificial line breaks |
|
||
|
||
#### Book and Chapter Options
|
||
|
||
| Option | Description |
|
||
|--------|-------------|
|
||
| **Chapter Control** | Select specific chapters from ePUBs or markdown files, or chapters and pages from PDFs |
|
||
| **Save each chapter separately** | Output a separate audio file for each chapter |
|
||
| **Create a merged version** | Combine all chapters into a single audio file |
|
||
| **Save in a project folder** | Save the output alongside available metadata files |
|
||
|
||
#### Advanced Options (Menu)
|
||
|
||
| Option | Description |
|
||
|--------|-------------|
|
||
| **Theme** | `System`, `Light`, or `Dark` |
|
||
| **Max words per subtitle** | Sets the maximum number of words per subtitle entry |
|
||
| **Silence between chapters** | Sets how many seconds of silence to insert between chapters |
|
||
| **Subtitle speed adjustment** | `TTS Regeneration` (better quality) or `FFmpeg Time-stretch` (faster) for subtitle files |
|
||
| **Use spaCy for segmentation** | Uses [spaCy](https://spacy.io/) for more accurate sentence boundaries. Recommended for `Sentence` and `Sentence + Comma` modes |
|
||
| **Silent gaps between subtitles** | Lets speech naturally continue into the gap instead of speeding up audio to match exact subtitle timing |
|
||
| **Pre-download models** | Downloads all models and voices so Abogen can run fully offline |
|
||
| **Disable Kokoro internet access** | Prevents Kokoro from fetching models from HuggingFace Hub |
|
||
| **Cache / Config** | Open or clear the cache and configuration directories |
|
||
|
||
---
|
||
|
||
### Voice Mixer
|
||
|
||
<img title="Abogen Voice Mixer" src='https://raw.githubusercontent.com/denizsafak/abogen/refs/heads/main/demo/voice_mixer.png'>
|
||
|
||
The Voice Mixer lets you blend multiple voice models together, control the weight of each one, and save the result as a named profile for future use.
|
||
|
||
> Thanks to [@jborza](https://github.com/jborza) for making this possible in [#5](https://github.com/denizsafak/abogen/pull/5).
|
||
|
||
---
|
||
|
||
### Queue Mode
|
||
|
||
<img title="Abogen queue mode" src='https://raw.githubusercontent.com/denizsafak/abogen/refs/heads/main/demo/queue.png'>
|
||
|
||
Queue mode lets you line up multiple files and convert them all in one go:
|
||
|
||
- Add `.txt`, `.srt`, `.ass`, or `.vtt` files using the **Add files** button or by dragging them in. For PDF, EPUB, or markdown files, use the main input box and click **Add to Queue**.
|
||
- Each file in the queue keeps the settings that were active when it was added.
|
||
- Enable **Override item settings** to apply the current main-window configuration to all queued items.
|
||
- Hover over any item in the queue to see its saved settings.
|
||
|
||
> Thanks to [@jborza](https://github.com/jborza) for adding queue mode in [#35](https://github.com/denizsafak/abogen/pull/35).
|
||
|
||
---
|
||
|
||
## 🌐 `Web Application (WebUI)`
|
||
|
||
### How to Run
|
||
|
||
```bash
|
||
abogen-web
|
||
```
|
||
|
||
Then open [http://localhost:8808](http://localhost:8808) in your browser. Jobs run in a background worker and the page updates automatically.
|
||
|
||
<img title="Abogen Web UI" src='https://raw.githubusercontent.com/denizsafak/abogen/refs/heads/main/demo/abogen-webui.png'>
|
||
|
||
### How to Use
|
||
|
||
1. Upload a document by dragging and dropping it or using the upload button.
|
||
2. Choose your voice, language, speed, subtitle style, and output format.
|
||
3. Click **Create job**. It will appear in the queue right away.
|
||
4. Watch live progress and logs update as the job runs. Download the audio and subtitle files when done.
|
||
5. Cancel or delete jobs at any time. Logs can be downloaded for troubleshooting.
|
||
|
||
Jobs are processed one at a time, in the order they were added.
|
||
|
||
---
|
||
|
||
### Container Image
|
||
|
||
```bash
|
||
docker build -t abogen .
|
||
mkdir -p ~/abogen-data/uploads ~/abogen-data/outputs
|
||
docker run --rm \
|
||
-p 8808:8808 \
|
||
-v ~/abogen-data:/data \
|
||
--name abogen \
|
||
abogen
|
||
```
|
||
|
||
Browse to [http://localhost:8808](http://localhost:8808). Uploaded source files are stored in `/data/uploads` and finished audio or subtitle files go to `/data/outputs`.
|
||
|
||
#### Environment Variables
|
||
|
||
| Variable | Default | Description |
|
||
|----------|---------|-------------|
|
||
| `ABOGEN_HOST` | `0.0.0.0` | Flask bind address |
|
||
| `ABOGEN_PORT` | `8808` | HTTP port |
|
||
| `ABOGEN_DEBUG` | `false` | Enable Flask debug mode |
|
||
| `ABOGEN_UPLOAD_ROOT` | `/data/uploads` | Where uploaded source files are stored |
|
||
| `ABOGEN_OUTPUT_DIR` | `/data/outputs` | Where finished audio and subtitles are saved |
|
||
| `ABOGEN_SETTINGS_DIR` | `/config` | JSON settings and configuration |
|
||
| `ABOGEN_TEMP_DIR` | `/data/cache` | Temporary working files during conversion |
|
||
| `ABOGEN_UID` / `ABOGEN_GID` | `1000` / `1000` | User and group IDs inside the container. Set these to match your host user to avoid file permission issues |
|
||
| `ABOGEN_LLM_BASE_URL` | `""` | Base URL of an OpenAI-compatible LLM endpoint |
|
||
| `ABOGEN_LLM_API_KEY` | `""` | API key for the LLM endpoint |
|
||
| `ABOGEN_LLM_MODEL` | `""` | Default model to use for LLM normalization |
|
||
| `ABOGEN_LLM_TIMEOUT` | `30` | Timeout in seconds for LLM requests |
|
||
| `ABOGEN_LLM_CONTEXT_MODE` | `sentence` | How much context to send to the LLM: `sentence`, `paragraph`, or `document` |
|
||
| `ABOGEN_LLM_PROMPT` | `""` | Custom normalization prompt template |
|
||
|
||
To find your host UID and GID:
|
||
```bash
|
||
id -u && id -g
|
||
```
|
||
|
||
#### Docker Compose (GPU)
|
||
|
||
The repo includes `docker-compose.yaml` set up for GPU hosts. Install the [NVIDIA Container Toolkit](https://docs.nvidia.com/datacenter/cloud-native/container-toolkit/latest/install-guide.html) first, then:
|
||
|
||
```bash
|
||
docker compose up -d --build
|
||
```
|
||
|
||
Key build options:
|
||
|
||
| Variable | Purpose |
|
||
|----------|---------|
|
||
| `TORCH_VERSION` | Pin a specific PyTorch release to match your driver |
|
||
| `TORCH_INDEX_URL` | Use a different PyTorch download index for a specific CUDA build |
|
||
| `ABOGEN_DATA` | Host path for uploads and outputs (default: `./data`) |
|
||
|
||
For **CPU-only** deployment, comment out the `deploy.resources.reservations.devices` block in the compose file.
|
||
|
||
---
|
||
|
||
### LLM-Assisted Text Normalization
|
||
|
||
Abogen can use an OpenAI-compatible LLM to clean up tricky text before synthesis, such as apostrophes, contractions, and abbreviations. Configure it at **Settings -> LLM**:
|
||
|
||
1. Enter your endpoint base URL (for example, `http://localhost:11434` for Ollama). Abogen appends `/v1/...` automatically.
|
||
2. Click **Refresh models**, pick a model, and adjust the timeout or prompt template if needed.
|
||
3. Use the preview box to test it, then save.
|
||
|
||
When running in Docker or a CI pipeline, you can pre-fill the form using `ABOGEN_LLM_*` environment variables. See `.env.example` for sample Ollama values.
|
||
|
||
---
|
||
|
||
### Audiobookshelf Integration
|
||
|
||
Finished audiobooks can be sent directly to your [Audiobookshelf](https://www.audiobookshelf.org/) server from **Settings -> Integrations -> Audiobookshelf**:
|
||
|
||
| Field | Description |
|
||
|-------|-------------|
|
||
| **Base URL** | Your ABS server address, e.g. `https://abs.example.com`. Do **not** append `/api` |
|
||
| **Library ID** | Found on the library's settings page in ABS |
|
||
| **Folder** | The destination folder name or ID. Click **Browse folders** to pick one from a list |
|
||
| **API Token** | A personal access token from ABS, found under *Account -> API tokens* |
|
||
|
||
You can enable automatic uploads for all future jobs, or trigger uploads manually from the job queue.
|
||
|
||
<details>
|
||
<summary><b>Reverse proxy setup for Nginx Proxy Manager</b></summary>
|
||
|
||
1. Create a **Proxy Host** pointing to your ABS container (default forward port: `13378`).
|
||
2. Under **SSL**, enable your certificate and optionally enable **Force SSL**.
|
||
3. In the **Advanced** tab, paste the following:
|
||
|
||
```nginx
|
||
proxy_set_header Host $host;
|
||
proxy_set_header X-Real-IP $remote_addr;
|
||
proxy_set_header X-Forwarded-For $proxy_add_x_forwarded_for;
|
||
proxy_set_header X-Forwarded-Proto $scheme;
|
||
proxy_set_header X-Forwarded-Host $host;
|
||
proxy_set_header X-Forwarded-Port $server_port;
|
||
proxy_set_header Authorization $http_authorization;
|
||
client_max_body_size 5g;
|
||
proxy_read_timeout 300s;
|
||
proxy_connect_timeout 300s;
|
||
```
|
||
|
||
4. Disable **Block Common Exploits**, as it strips `Authorization` headers in some NPM versions.
|
||
5. Enable **Websockets Support** on the main proxy screen.
|
||
6. If ABS is served under a path prefix like `/abs`, add a **Custom Location** with `Location: /abs/` and set the **Forward Path** to `/`.
|
||
|
||
To check that everything is working:
|
||
```bash
|
||
curl -i "https://abs.example.com/api/libraries" \
|
||
-H "Authorization: Bearer YOUR_API_TOKEN"
|
||
```
|
||
|
||
A JSON response with library data confirms the proxy is set up correctly. You can then use **Browse folders** and **Test connection** inside Abogen's settings to verify the full integration.
|
||
|
||
</details>
|
||
|
||
---
|
||
|
||
### JSON Endpoints
|
||
|
||
| Endpoint | Description |
|
||
|----------|-------------|
|
||
| `GET /api/jobs/<id>` | Returns job metadata, progress, and log lines as JSON |
|
||
| `GET /partials/jobs` | Returns the live job list as HTML (used by htmx for polling) |
|
||
| `GET /partials/jobs/<id>/logs` | Returns the log window for a specific job |
|
||
|
||
More automation endpoints are planned. Contributions are welcome.
|
||
|
||
---
|
||
|
||
## Core Features
|
||
|
||
### Chapter Markers
|
||
|
||
When you process ePUB, PDF or markdown files, Abogen converts them into text files stored in your cache directory. When you click "Edit," you're actually modifying these converted text files. In these text files, you'll notice tags that look like this:
|
||
|
||
```
|
||
<<CHAPTER_MARKER:Chapter Title>>
|
||
```
|
||
These are chapter markers. They are automatically added when you process ePUB, PDF or markdown files, based on the chapters you select. They serve an important purpose:
|
||
- Allow you to split the text into separate audio files for each chapter
|
||
- Save time by letting you reprocess only specific chapters if errors occur, rather than the entire file
|
||
|
||
You can manually add these markers to plain text files for the same benefits. Simply include them in your text like this:
|
||
|
||
```
|
||
<<CHAPTER_MARKER:Introduction>>
|
||
This is the beginning of my text...
|
||
|
||
<<CHAPTER_MARKER:Main Content>>
|
||
Here is another section...
|
||
```
|
||
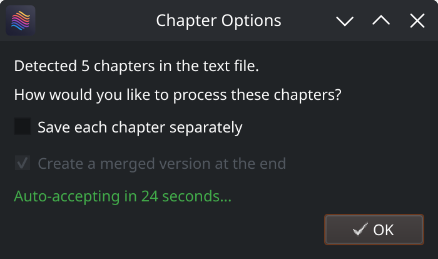
When you process the text file, Abogen will detect these markers automatically and ask if you want to save each chapter separately and create a merged version.
|
||
|
||
|
||
|
||
## Metadata Tags
|
||
Similar to chapter markers, it is possible to add metadata tags for `M4B` files. This is useful for audiobook players that support metadata, allowing you to add information like title, author, year, etc. Abogen automatically adds these tags when you process ePUB, PDF or markdown files, but you can also add them manually to your text files. Add metadata tags **at the beginning of your text file** like this:
|
||
```
|
||
<<METADATA_TITLE:Title>>
|
||
<<METADATA_ARTIST:Author>>
|
||
<<METADATA_ALBUM:Album Title>>
|
||
<<METADATA_YEAR:Year>>
|
||
<<METADATA_ALBUM_ARTIST:Album Artist>>
|
||
<<METADATA_COMPOSER:Narrator>>
|
||
<<METADATA_GENRE:Audiobook>>
|
||
<<METADATA_COVER_PATH:path/to/cover.jpg>>
|
||
```
|
||
> Note: `METADATA_COVER_PATH` is used to embed a cover image into the generated M4B file. Abogen automatically extracts the cover from EPUB and PDF files and adds this tag for you.
|
||
|
||
---
|
||
|
||
### Timestamp-based Text Files
|
||
|
||
Similar to converting subtitle files to audio, Abogen can automatically detect text files that contain timestamps in `HH:MM:SS`, `HH:MM:SS,ms` or `HH:MM:SS.ms` format. When timestamps are found inside your text file, Abogen will ask if you want to use them for audio timing. This is useful for creating timed narrations, scripts, or transcripts where you need exact control over when each segment is spoken.
|
||
|
||
Format your text file like this:
|
||
```
|
||
00:00:00
|
||
This is the first segment of text.
|
||
|
||
00:00:15
|
||
This is the second segment, starting at 15 seconds.
|
||
|
||
00:00:45
|
||
And this is the third segment, starting at 45 seconds.
|
||
```
|
||
|
||
**Notes:**
|
||
- Timestamps must be in `HH:MM:SS`, `HH:MM:SS,ms` or `HH:MM:SS.ms` format (e.g., `00:05:30` for 5 minutes 30 seconds, or `00:05:30.500` for 5 minutes 30.5 seconds)
|
||
- Milliseconds are optional and provide precision up to 1/1000th of a second
|
||
- Text before the first timestamp (if any) will automatically start at `00:00:00`
|
||
- When using timestamps, the subtitle generation mode setting is ignored
|
||
|
||
---
|
||
|
||
### Supported Languages
|
||
|
||
```
|
||
🇺🇸 'a' - American English 🇬🇧 'b' - British English
|
||
🇪🇸 'e' - Spanish (es) 🇫🇷 'f' - French (fr-fr)
|
||
🇮🇳 'h' - Hindi 🇮🇹 'i' - Italian
|
||
🇯🇵 'j' - Japanese* 🇧🇷 'p' - Brazilian Portuguese
|
||
🇨🇳 'z' - Mandarin Chinese*
|
||
```
|
||
|
||
> \* Requires extra packages: `pip install misaki[ja]` for Japanese, `pip install misaki[zh]` for Mandarin.
|
||
|
||
For a complete list of supported languages and voices, refer to Kokoro's [VOICES.md](https://huggingface.co/hexgrad/Kokoro-82M/blob/main/VOICES.md). To listen to sample audio outputs, see [SAMPLES.md](https://huggingface.co/hexgrad/Kokoro-82M/blob/main/SAMPLES.md).
|
||
|
||
> **Note:** Word-level subtitle modes like `1 word` or `2 words` are only available for English, because Kokoro only provides timestamp tokens for English text. For other languages, Abogen falls back to duration-based timing that supports `Line`, `Sentence`, and `Sentence + Comma` modes.
|
||
|
||
---
|
||
|
||
## Troubleshooting
|
||
|
||
For detailed error messages, run Abogen in CLI mode:
|
||
|
||
```bash
|
||
abogen-cli
|
||
```
|
||
|
||
If you used the Windows installer, navigate to `python_embedded/Scripts` and run `abogen-cli.exe` from there.
|
||
|
||
If you cannot resolve the issue, please [open a GitHub issue](https://github.com/denizsafak/abogen/issues) and include the error output along with a description of what you were doing.
|
||
|
||
---
|
||
|
||
### Common Issues
|
||
|
||
<details>
|
||
<summary><b>How to fix "CUDA GPU is not available. Using CPU" warning?</b></summary>
|
||
|
||
This means PyTorch could not find a supported GPU and fell back to the CPU. Abogen will still work, but conversion will be slower.
|
||
|
||
**If you have a compatible NVIDIA GPU on Windows,** try reinstalling PyTorch with the right CUDA version:
|
||
|
||
```bash
|
||
# CUDA 12.8
|
||
python_embedded\python.exe -m pip install --force-reinstall torch==2.8.0+cu128 torchvision==0.23.0+cu128 torchaudio==2.8.0 --index-url https://download.pytorch.org/whl/cu128
|
||
|
||
# CUDA 12.6 (for older GPUs that do not support CUDA 12.8)
|
||
python_embedded\python.exe -m pip install --force-reinstall torch==2.8.0+cu126 torchvision==0.23.0+cu126 torchaudio==2.8.0 --index-url https://download.pytorch.org/whl/cu126
|
||
```
|
||
|
||
**If you installed with uv,** uninstall and reinstall with a different CUDA version:
|
||
```bash
|
||
uv tool uninstall abogen
|
||
|
||
# Try CUDA 12.6 for older drivers
|
||
uv tool install --python 3.12 abogen[cuda126] --extra-index-url https://download.pytorch.org/whl/cu126 --index-strategy unsafe-best-match
|
||
|
||
# Or CUDA 13.0 for newer drivers
|
||
uv tool install --python 3.12 abogen[cuda130] --extra-index-url https://download.pytorch.org/whl/cu130 --index-strategy unsafe-best-match
|
||
```
|
||
|
||
**If you have an AMD GPU,** you need to use Linux with ROCm. See the [Linux installation instructions](#linux). See [#32](https://github.com/denizsafak/abogen/issues/32) for more details.
|
||
|
||
</details>
|
||
|
||
<details>
|
||
<summary><b>How to fix "WARNING: The script abogen-cli is installed in '/home/username/.local/bin' which is not on PATH" error in Linux?</b></summary>
|
||
|
||
This means the directory where Abogen was installed is not included in your shell's PATH. Run the following command to add it permanently:
|
||
|
||
```bash
|
||
echo 'export PATH="$HOME/.local/bin:$PATH"' >> ~/.bashrc && source ~/.bashrc
|
||
```
|
||
|
||
If you are using a different shell like Zsh or Fish, replace `~/.bashrc` with `~/.zshrc` or `~/.config/fish/config.fish` accordingly.
|
||
|
||
</details>
|
||
|
||
<details>
|
||
<summary><b>How to fix "No matching distribution found" error?</b></summary>
|
||
|
||
This usually means your Python version is not supported. Make sure you are using Python 3.10-3.12.
|
||
|
||
Use [uv](https://docs.astral.sh/uv/getting-started/installation/) to manage Python versions automatically (it will install the right version for you), or use [pyenv](https://github.com/pyenv/pyenv) if you prefer to manage versions manually.
|
||
|
||
</details>
|
||
|
||
<details>
|
||
<summary><b>How to fix "[WinError 1114] A dynamic link library (DLL) initialization routine failed" error?</b></summary>
|
||
|
||
This error usually happens when PyTorch is installed with a CUDA version that does not match your GPU or driver.
|
||
|
||
**If you used the Windows installer:**
|
||
```bash
|
||
python_embedded\python.exe -m pip install --force-reinstall torch==2.8.0+cu128 torchvision==0.23.0+cu128 torchaudio==2.8.0 --index-url https://download.pytorch.org/whl/cu128
|
||
```
|
||
|
||
**If you used pip:**
|
||
```bash
|
||
pip install --force-reinstall torch==2.8.0 torchaudio==2.8.0 torchvision==0.23.0 --index-url https://download.pytorch.org/whl/cu128
|
||
```
|
||
|
||
If that does not work, try the CUDA 12.6 version instead by replacing `cu128` with `cu126` in the command above.
|
||
|
||
</details>
|
||
|
||
<details>
|
||
<summary><b>How to fix Japanese audio not working?</b></summary>
|
||
|
||
Japanese audio requires an additional package. Install it with:
|
||
|
||
```bash
|
||
pip install misaki[ja]
|
||
```
|
||
|
||
If the issue persists, see [#56](https://github.com/denizsafak/abogen/issues/56) for details and solutions from the community.
|
||
|
||
</details>
|
||
|
||
<details>
|
||
<summary><b>How to uninstall Abogen?</b></summary>
|
||
|
||
1. In the settings menu, open and delete the **configuration directory**.
|
||
2. In the settings menu, open and delete the **cache directory**.
|
||
3. Then uninstall the package:
|
||
|
||
```bash
|
||
# If installed with pip
|
||
pip uninstall abogen
|
||
pip cache purge
|
||
|
||
# If installed with uv
|
||
uv tool uninstall abogen
|
||
uv cache clear
|
||
```
|
||
|
||
If you used the Windows installer, simply delete the Abogen folder. Everything is self-contained inside `python_embedded`, so no other directories are created elsewhere on your system.
|
||
|
||
If you installed espeak-ng separately, you will need to uninstall it separately as well.
|
||
|
||
</details>
|
||
|
||
<details>
|
||
<summary><b>About the name "abogen"</b></summary>
|
||
|
||
The name is a shortened form of **"audiobook generator"**.
|
||
|
||
After releasing the project, I learned from [community feedback](https://news.ycombinator.com/item?id=44853064#44857237) that the prefix *"abo"* can be read as an ethnic slur in certain regions, particularly in Australia and New Zealand. This was completely unintentional. English is not my first language, and the name was chosen only for its technical meaning. I am grateful to everyone who pointed this out, as it helps keep this project welcoming to all.
|
||
|
||
</details>
|
||
|
||
---
|
||
|
||
## MPV Recommended Config
|
||
|
||
[MPV](https://mpv.io/installation/) is highly recommended for playback, since it can display subtitles even for audio-only files. Here is a suggested `mpv.conf`:
|
||
|
||
```
|
||
save-position-on-quit
|
||
keep-open=yes
|
||
audio-display=no
|
||
# --- Subtitle ---
|
||
sub-ass-override=no
|
||
sub-margin-y=50
|
||
sub-margin-x=50
|
||
# --- Audio Quality ---
|
||
audio-spdif=ac3,dts,eac3,truehd,dts-hd
|
||
audio-channels=auto
|
||
audio-samplerate=48000
|
||
volume-max=200
|
||
```
|
||
|
||
---
|
||
|
||
## Similar Projects
|
||
Abogen is a standalone project, but it is inspired by and shares some similarities with other projects. Here are a few:
|
||
- [audiblez](https://github.com/santinic/audiblez): Generate audiobooks from e-books. **(Has CLI and GUI support)**
|
||
- [autiobooks](https://github.com/plusuncold/autiobooks): Automatically convert epubs to audiobooks
|
||
- [pdf-narrator](https://github.com/mateogon/pdf-narrator): Convert your PDFs and EPUBs into audiobooks effortlessly.
|
||
- [epub_to_audiobook](https://github.com/p0n1/epub_to_audiobook): EPUB to audiobook converter, optimized for Audiobookshelf
|
||
- [ebook2audiobook](https://github.com/DrewThomasson/ebook2audiobook): Convert ebooks to audiobooks with chapters and metadata using dynamic AI models and voice cloning
|
||
|
||
## Roadmap
|
||
|
||
- [ ] OCR scan support for PDF files (docling/tesseract)
|
||
- [ ] Multi-language GUI support
|
||
- [ ] kokoro-onnx support (if needed)
|
||
- [x] Chapter metadata for `.m4b` files ([#10](https://github.com/denizsafak/abogen/pull/10))
|
||
- [x] Voice mixer for blending voice models ([#5](https://github.com/denizsafak/abogen/pull/5))
|
||
- [x] Dark mode
|
||
|
||
---
|
||
|
||
## Contributing
|
||
|
||
Contributions are welcome. Fork the repository, make your changes, and open a pull request.
|
||
|
||
To set up a local development environment:
|
||
|
||
```bash
|
||
pip install -e .[dev] # Editable install with build dependencies
|
||
python -m build # Optional: builds the package in the dist folder
|
||
abogen # Launch the GUI
|
||
```
|
||
|
||
<details>
|
||
<summary><b>Using uv</b></summary>
|
||
|
||
```bash
|
||
# Go to the directory where you extracted the repository and run:
|
||
uv venv --python 3.12 # Creates a virtual environment with Python 3.12
|
||
# After activating the virtual environment, run:
|
||
uv pip install -e . # Installs the package in editable mode
|
||
uv build # Builds the package in dist folder (optional)
|
||
abogen # Opens the GUI
|
||
```
|
||
|
||
</details>
|
||
|
||
> Use Python 3.10-3.12. Create a virtual environment if needed.
|
||
|
||
---
|
||
|
||
## Credits
|
||
|
||
- Web UI implementation by [@jeremiahsb](https://github.com/jeremiahsb)
|
||
- Abogen uses [Kokoro](https://github.com/hexgrad/kokoro) for its high-quality, natural-sounding text-to-speech synthesis. Huge thanks to the Kokoro team for making this possible.
|
||
- Thanks to the [spaCy](https://spacy.io/) project for its sentence-segmentation tools, which help Abogen produce cleaner, more natural sentence segmentation.
|
||
- Thanks to [@wojiushixiaobai](https://github.com/wojiushixiaobai) for [Embedded Python](https://github.com/wojiushixiaobai/Python-Embed-Win64) packages. These modified packages include pip pre-installed, enabling Abogen to function as a standalone application without requiring users to separately install Python in Windows.
|
||
- Thanks to creators of [EbookLib](https://github.com/aerkalov/ebooklib), a Python library for reading and writing ePub files, which is used for extracting text from ePub files.
|
||
- Special thanks to the [PyQt](https://www.riverbankcomputing.com/software/pyqt/) team for providing the cross-platform GUI toolkit that powers Abogen's interface.
|
||
- Icons: [US](https://icons8.com/icon/aRiu1GGi6Aoe/usa), [Great Britain](https://icons8.com/icon/t3NE3BsOAQwq/great-britain), [Spain](https://icons8.com/icon/ly7tzANRt33n/spain), [France](https://icons8.com/icon/3muzEmi4dpD5/france), [India](https://icons8.com/icon/esGVrxg9VCJ1/india), [Italy](https://icons8.com/icon/PW8KZnP7qXzO/italy), [Japan](https://icons8.com/icon/McQbrq9qaQye/japan), [Brazil](https://icons8.com/icon/zHmH8HpOmM90/brazil), [China](https://icons8.com/icon/Ej50Oe3crXwF/china), [Female](https://icons8.com/icon/uI49hxbpxTkp/female), [Male](https://icons8.com/icon/12351/male), [Adjust](https://icons8.com/icon/21698/adjust) and [Voice Id](https://icons8.com/icon/GskSeVoroQ7u/voice-id) icons by [Icons8](https://icons8.com/).
|
||
|
||
---
|
||
|
||
## License
|
||
|
||
This project is available under the MIT License - see the [LICENSE](https://github.com/denizsafak/abogen/blob/main/LICENSE) file for details.
|
||
[Kokoro](https://github.com/hexgrad/kokoro) is licensed under [Apache-2.0](https://github.com/hexgrad/kokoro/blob/main/LICENSE) which allows commercial use, modification, distribution, and private use.
|
||
|
||
---
|
||
|
||
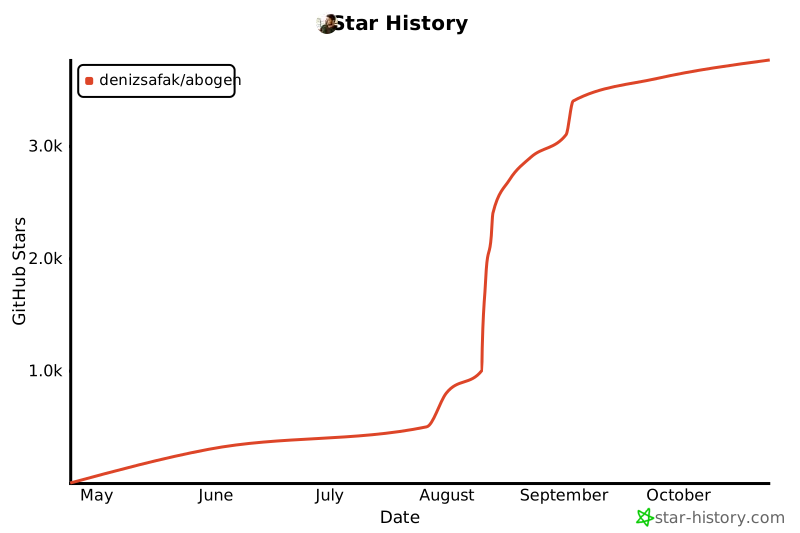
## Star History
|
||
|
||
[](https://www.star-history.com/#denizsafak/abogen&Date)
|
||
|
||
---
|
||
|
||
> Tags: audiobook, kokoro, text-to-speech, TTS, audiobook generator, audiobooks, text to speech, audiobook maker, audiobook creator, audiobook generator, voice-synthesis, text to audio, text to audio converter, text to speech converter, text to speech generator, text to speech software, text to speech app, epub to audio, pdf to audio, markdown to audio, subtitle to audio, srt to audio, ass to audio, vtt to audio, webvtt to audio, content-creation, media-generation
|